Wednesday, August 31, 2011

Canning Tomatoes v. Slicing Tomatoes

I grow mostly roma's.  A great canning and paste tomato.  I also grow a few slicing/beefsteak tomatoes for the fresh eating.  On canning day, they all go into jars.  Just to explain the differences between the two types and why you want to grow canning tomatoes for canning and not just grow slicing tomatoes.

If you look at my post on canned tomatoes, I show a lot of pictures demonstrating the process of blanching and peeling.  What I didn't show you  was the extra steps I had to do for the slicing tomatoes.  Due to the shape of the tomato and the shoulders (the rounded part by the stem), I had to core the tomato before I blanched them.

The red ones are Pantano Romanesco and the deep red/purple ones are Cherokee Purple.


Can you see the splits in the shoulders?  A common problem in a slicing tomato, they make it harder to peel even after blanching.  They act just like a blemish and have to be cut around.

Due to the size of the tomatoes, they have to be halved or fourthed before they can go into the jars. 

These two varieties did hold up well, just so much more work.


Left is Pantano Romanesco, Middle is Roma, Right is Cherokee Purple
 This also demonstrates two other points.

1. A definite need to label what is in the jar.  I usually label 'Tom 8-11' but in this case, I didn't want to think the purple or romanesco tomatoes were bad in 6 months because they are a different hue.  I labeled them what they are because they are different from what I normally bottle as tomatoes.

2. There is space saving features in using the roma/paste style tomatoes over beef steak.  The amount of unused space in the bottom of the jars is far greater in the beefsteak/slicing type tomatoes.

Monday, August 29, 2011

Italian pasta Salad

My amazing husband came up with this simple pasta recipe.  It is delish and a fabulous way to use food storage and fresh produce together.  Zesty and sweet, rolled into one.

This makes a great side dish or an easy lunch for a warm summer day.  When you don't want to heat the whole house up in the evening, simply cook the pasta in the morning or late the night before!

ITALIAN PASTA SALAD
2 c. Pasta, cooked and drained
1 1/2 md Carrot, shredded
1/2 Tomato, diced
1/2 Cucumber, diced
1/4 c. Italian Dressing

Mix all ingredients in bowl.  Chill until time to serve.


Friday, August 26, 2011

Canned Tomatoes !!!

I am always so happy when my tomatoes start getting ripe!  It means that I can get started on the biggest crop my garden provides me with.

Yes.  There are cucumbers again too.  :)

We eat fresh the firstlings .... then we get to canning!  This small batch of tomatoes will only provide me with a few canners full. 

I got 16 quarts out of this sink full. 

In case you have never canned tomatoes before, I have taken pictures of the different steps to help you along.

You do not need to wash the tomatoes, I only rinse them, so the grass, leaves, petals and other pieces that are not attached get rinsed off.  You don't actually even need to do that.

Once your tomatoes are gathered up, you need to BLANCH them.  This is a process where you place the tomatoes in boiling hot water and then remove them to cold water so the skins will come off.


Typically the skins will start to split, and a small amount of pressure will cause them to 'slip' off.  Sometimes you need to use a knife to get it started, or to lift the skin from the flesh of the tomato and peel it.  You should never have to cut the skins off, except at the stem and if there are any blemishes you may have to cut right around the blemish.  If you are cutting more than that, you need to boil them just a little longer.


Once the tomatoes are blanched and peeled, you simply pack them in the jars following the wonderful instructions in your canning book.  The book I own is the Ball Blue Book of Preserving, but since it looks like that is an old version, I would simply recommend getting any Ball Blue Book at a reasonable price.  It is a wonderful quick reference.  It has just enough detail, not so little you are lost and not so much you are overwhelmed.  Great for beginners!

One last tip for blanching.  The temperature of the water, the time in the hot water and the ripeness of the tomato all play a part in the finished product.


The first tomato is very ripe.  The second tomato is barely ripe.  They were blanched at a lower temperature than the third barely ripe and the fourth very ripe tomato.  Can you see the texture difference?  The two on the left are very firm and the two on the right are almost mushy.  Both are good for canning, but the ones on the left will be prettier.


Thursday, August 25, 2011

Grapes!!

I love my grape vines.  I planted them about 4-5 years ago, moved them about 3 years ago, lost one of my two vines and finally got a crop.  Yeah!  It was only 3 bunches and I had to save them from the wasps that were eating them, but they are sooooo yummy!


We did find the wasp nest in a neighbors tree ......  We were wondering why they hadn't tried to build in the eaves of the house like the last 3 years.  I guess they found a more suitable spot, a hiding spot of sorts. 


We found 'em!!

Tuesday, August 23, 2011

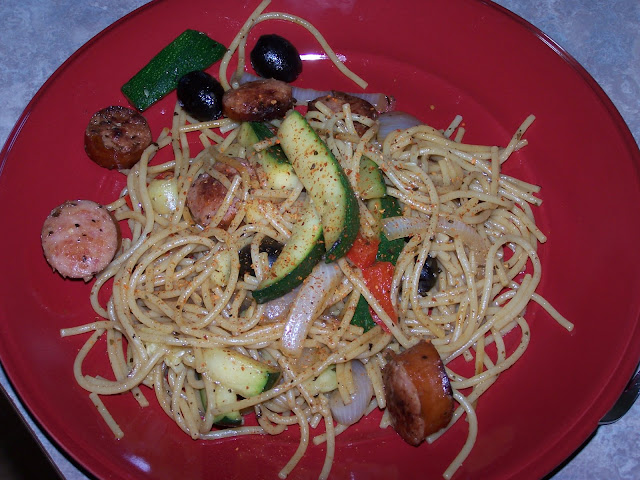
Zucchini Pasta

Right now I have a major abundance of zucchini coming from my garden.  My favorite thing to do, other than dehydrating it, is to mix it with pasta and sausage in the best dinner ever.
I got this recipe originally from Your Home Based Mom then I changed it up a little to suite my style.  :)  She calls it Lite Pasta, but I don't think it's very 'lite'.  :)

ZUCCHINI PASTA
16 oz Spaghetti Pasta, cooked and kept warm
32 oz Kielbasa Sausage, sliced
1 Red Bell Pepper, cubed
1 Onion, sliced
2 tsp Basil
2 tsp Garlic
2 tsp Chicken Bouillon
1 small Zucchini cut into approx. 1/2 x 2" sticks
1 can Olives, drained

Brown sliced sausage in pan.  Remove from pan and saute Onion and Pepper.  Add olive oil if there is not enough left from sausage.
Add Basil, Garlic, Bouillon and Zucchini.  Cook until Zucchini is tender.
Toss vegetable blend, sausage and olives with pasta.

My husband likes it with a little cayenne on it.

Thursday, August 18, 2011

Cucumbers and Carrots and Green Beans ... Oh My!!


So.  My garden is determined to kick my butt this year.  Carrots are having a slow start, but the cucumbers and squash are in full swing and the green beans are coming to a close.

It's not the first canning I have done this year ....  but man, it was the most in one day!
27 pints of pickles
3 qts of pickles
9 pints of green beans
1 pint of carrots (thank goodness they process the same as green beans!)
16 half pints of chicken

There is enough chicken prepared to put up maybe 24 more half pints, but I am out of energy for the day.  It will have to wait until tomorrow.


I am most excited for the pickles.  I bought a new book, "You Can Can"  I wouldn't recommend it instead of the Ball Blue Book, but it has some different recipes in it which can be fun.  We made dill, with dill fresh from the garden and dill from a store bought packet.  We also made sweet and spicy dill and bread and butter chips.  1 qt of whole dill and 2 qts of spears. 

Thanks to the invention of the mandolin slicer and the discount store selling one for $12, my chips are all perfectly sliced.  Literally. 

Now, I am exhausted. 

Peace Out Folks.

Saturday, August 13, 2011

Cherries !!!

I DID NOT GROW THESE beautiful tasty cherries.  I wish I had a tree, but unfortunately we do not.  A kind co-worker offered to let us finish cleaning off his tree and I swear we got a couple hundred dollars worth off the tree.  I am so into planting a cherry tree now.  :)


I do not know how many pounds we picked, I just know it was a lot and after all my canning efforts, we still had 11 lbs for fresh eating!

23 quarts.  Makes my food storage happy!  Yummy yummy!!

Friday, August 12, 2011

My Garden

I have a tiny tiny lot.  I suppose it is large compared to someobdy in a town home or condo ...  but for a stand alone house, it's small.  Not even 1/5 of an acre and the house is huge at 3600 sq ft.  So if you can imagine, there is not much yard left.

Some people think I have such a huge garden, but the fact is ....it is only 240 sq feet.  It is only even that big, this year after we put in 2 more beds.  We have 6 4x8 beds and 3 2x8 beds.  In this space I have been able to grow 19 tomato plants (we lost one), 1 bell pepper, 32 ft of beets, 56 ft of carrots, 40 ft of bush beans (if you compared it to row plantings), 1 watermelon vine, 3 cucumber vines, 2 zucchini, 1 yellow crook neck and 2 smaller melon vines like honey dew.  In my beds I have also added the permanent plants of lavendar, dill, Rhubarb, pot marigold and chives...I think I may have to replant the chives.

I have some border beds...what others use as flower beds, and in them I have planted various herbs and edibles.  I have mint, marjoram, poppy, thyme, and pineapple sage.  We have a planting of raspberries above a retaining wall and a grape vine that frames a window.  We have planted peach, apple and choke cherry trees.  I have plans to plant more herbs and edibles.

My point in this posting is ...  no matter the size of your yard or garden.  You can grow SOMETHING.  Only have a small decorative flower bed??  Thyme is a beautiful plant which produces green or green/yellow foliage and purple flowers.  Mint, Sage and Chives are just green foliage and if you interplant them with flowering bulbs for color can make a low maintenance and beautiful border or bed.

South facing window?  Hang a pot w/ cherry tomatoes.  Small patio or porch?  Plant stands with anything can be nice.  Cucumbers and tomatoes can make good container vines while peppers and eggplant and almost any herb make pretty upright plants.


Don't judge me.  I was too lazy to roll up the hose for the picture.  :)  We have the auto water system working now so no more hose except when starting new seeds.


I love my poppies.  They grew and bloomed!  Last year, they grew and died.  :)   This bed is about 2 feet deep and runs the length of my front porch.  I have room for a few bush/trees here and plan on planting currant bushes.  The poppies are planted to border the currant bushes I will plant next spring.  I love red flowers, they are my FAVORITE!